Nattō (なっとう or 納豆?) is a traditional Japanese food made from soybeans fermented with Bacillus subtilis var. natto. Some eat it as a breakfast food. Nattō may be an acquired taste because of its powerful smell, strong flavor, and slimy texture. In Japan, nattō is most popular in the eastern regions, including Kantō, Tōhoku, and Hokkaido.
Before Making NATTO:
Be sure the entire processing area is cleaned for production. Make sure all utensils, pots, cheesecloth (FUKIN), etc. are as sterile as possible. (Boil utensils for 5 minutes prior to using.)
The packet of NATTO spores comes with a special small spoon; be sure to use the small spoon to measure the appropriate quantity for the recipe.
The fermentation process requires the NATTO be kept at approximately 100°F (37°C) degrees for 24 hours. Ovens with a low temperature setting can be used, an oven w/ light on only, or inoculate in large cube-shaped food dehydrators.
NATTO is quite odorous while fermenting, and you may want to isolate the fermenting NATTO during this time.
Ingredients and Supplies needed for Making NATTO:
2 pounds (900g) soybeans (about 4 cups)
10cc water, boiled for 5 to 10 minutes to sterilize
One spoonful (0.1 g.) NATTO-kin spores (use the special spoon that came with the packet)
Cheesecloth or butter muslin (FUKIN in Japanese)
Non-reactive pot (i.e., stainless steel, enameled, ceramics, etc.) or Pressure cooker
Large stainless steel, wood, or plastic spoon or spatula
3-4 oven-proof glass containers with lids
Instructions for Making NATTO:
– Wash the soybeans using running water to gets rid of tiny dirt or dead skins off the beans.
Washing the Soaked Soy Beans
– Soak with clean water for 9 to 12 hours (longer soaking time recommended during colder months). Be sure to use approximately 3 parts water and 1 part soybeans to allow for expansion. You will end up with 8 to 12 cups of beans.
Draining Soy Bean for Steaming/Boiling
Drain the beans from the soaking water. Place beans in a large pot with mesh bowl and pour in water. Steam it for 3-4 hours. Or fill with water and boil 5-6 hours. The recommended way is to use a “Pressure cooker”, that can be cooked faster than in a normal pot. Please refer to the pressure cooker instruction manual for operation guidelines.
Steaming Soy Beans for Natto-Kin
– Drain the cooked beans and place in a sterilized pot. Dissolve 1/5 special spoonful of NATTO spores (0.1g) into 10cc of sterilized water (or mix by package directions).
Types of Natto Spores From Japan
– Immediately pour the NATTO spore solution over the beans while the beans are still warm but not hot to the touch. Stir the beans and water mixture together carefully using a sterilized spoon/spatula.
Inoculation With Natto Spores
– Place a thin layer of beans in each of the 3 to 4 containers. If at any point during the process some beans are spilled on the counter, etc., discard the spilled beans as they can contaminate the other beans if added back in to the batch.
Natto Being Packed into Serving Trays
Place the sterilized cheese cloth over the top of the containers and place the tight-fitting lid over the cheese cloth. Preheat the oven, dehydrator, or KOTATSU Japanese Warmer to 100°F (37°C). Place the covered containers in the oven, dehydrator, or warmer and allow the NATTO to ferment for 24 hours being sure to keep the temperature steady at 100°F (37°C). Check the temperature throughout the day/night.
Inoculation Time !
At the conclusion of the fermentation period, let the NATTO cool for a couple of hours, then remove the lid and the cloth, replace the lid, and store the containers in the refrigerator at least overnight.
NATTO can also be aged in the refrigerator for 3-4 days. Smaller portions of finished NATTO can be stored in the freezer and thawed for later use.
Ready to Eat…YUM!
Need Natto spores fresh from Japan? We have them in our store with many other types of food culturing spores:
This sweetened miso and eggplant stir-fry is great with a simple bowl of steamed rice!
A quick and easy dish, that is nice and healthy.
Vegan – Veggie – Cultured
Ingredients…
1 cup Dashi of 9 kinds of vegetables, no fish. Start with kombu seaweed, onions/scallions, garlic, carrots, and other veggies to your liking.
1 tbsp organic aka-miso/RED miso
1-2 tbsp organic soy sauce
2 tbsp sake
2 tbsp sugar or mirin
2 tbsp organic sesame oil
1 tbsp grated ginger
1/2 cup radish, daikon, Julienned
5 tbsp vegetable/cooking oil of your choice
4-5 long Japanese eggplant, cut long ways, then into 1 inch pieces
Directions…
Try to use as many organic ingredients you can buy/find…the taste and flavor will be stronger. Start by combining the miso, soy sauce, sake, and sugar until dissolved and smooth.
Fry the ginger in the sesame oil for a few seconds, just to flavour the pan/wok. Remove and set aside.
Add the vegetable oil and then the eggplant. Fry until soft and golden. Then add the ginger and daikon, stirring for 2 minutes. Remove from heat. Add the miso mixture, tossing to coat each piece evenly.
If you prefer it saltier or sweeter, simply add more miso or sugar.
Alternatively, eliminate everything but the miso sauce and eggplant. Slice the eggplant into disks and deep fry it, then simply pour the miso sauce over it.
Garnish with finely sliced green onion and serve hot.
These condiment sides are a great way to enhance a meal or dish. Very easy to make and uses only a few ingredients. The Japanese use many of these condiment sides every day and most contain minerals and micro-nutrients that normal
salt and pepper cannot compare.
Seaweed Furikake (Nori Fumi Furikake)
In Japan, Furikake is a popular table seasoning that comes in a variety of flavors.
Nori fumi furikake, meaning seaweed flavored furikake, is a very popular flavor, and for good reason! It’s a classic combination used on plain rice, for a cheap meal. Just a sprinkle gives the perfect boost of flavor for rice, noodles, soup, or other dishes!
How to use furikake besides adding to white rice? Try using Japanese furikake with any recipe that calls for shredded nori on top.
Ingredients…
1/4 cup white sesame seeds
1/4 cup black sesame seeds
2 sheets nori seaweed
1 teaspoon sea salt
1 teaspoon sugar
Directions…
– Start by grinding the black and white sesame seeds. Add the sea salt and sugar, grind until texture is correct.
– Next, toast the nori over an open flame for a few seconds, if not already toasted.
Cut nori sheet into long thin strips. Now layer several strips and fold over 2 or 3 times. Cut the folded nori into very tiny strips. For better looks, cut the nori into very small pieces vs. grinding/blending them up.
Shichimi Togarashi, Japanese Seven Spice
Shichimi Togarashi
With the expanding appreciation of Japanese cuisine here in this country, there is a need to incorporate the seasonings needed to create and enhance them as well. This seasoning is popular in Japan and used to add both heat and flavor to dishes such as soba noodles, udon, beef tataki, jasmine rice. The heat of this seasoning, unknown in most Japanese cuisine, is just a little. So there is just a hint. Hand mixed from orange peel, black, white and toasted sesame seeds, cayenne, ginger, Szechwan pepper and nori.
Ingredients…
1/8 c – Orange/tangerine peel, dried
1/8 c – Black sesame seeds
½ c – Toasted white sesame seeds(dehulled)
– Toasted nori – 2 sheets
– Japan or Korean chili, to taste
– 1/8 or 1/2 teaspoon – Dried ginger root
– Szechwan pepper, to taste
– Optional, one may add hemp seeds and shiso to the mix
Directions…
Start by grinding the orange peel, black/white sesame seeds, ginger, pepper, and chilies.
Once your happy with the grind and flavor, next is to add the nori sheets
Toast the nori over an open flame for a few seconds, if not already toasted.
Cut nori sheet into long thin strips. Now layer several strips and fold over 2 or 3 times. Cut the folded nori into very tiny strips. For better looks, cut the nori into very small pieces vs. grinding/blending them up.
Yukari Shiso Salt – Yaki Onigiri
This is very easy and no recipe is really needed… Ingredients…
– Shiso leaf, dried, ground
– High quality sea salt, ground
Directions…
Mix 1/3c shiso leaf with 2/3c sea salt
Place in sealed container for long term storage
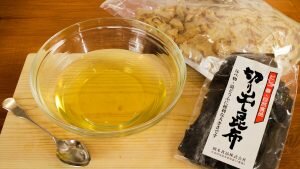
Dashi
Not really a condiment as it is used as a base, to build other flavors from. Used in many traditional Japanese dishes for that great added layer of flavor, called umami. Simple to make, but it adds a lot of flavor to a dish. Vegans and veggies can just make a seaweed and veggie dashi vs. using the bonito flakes.
Ingredients…
– 2 (4-inch) square pieces kombu – 2 1/2 quarts water – 1/2-ounce bonito flakes or katsuobushi, about 2 cups
Note: For vegans make a vegetable broth w/ carrots, onions, seaweeds, garlic, and shiitake mushrooms
Directions…
Put the kombu in a 4-quart saucepan, cover with the water and soak for 30 minutes.
Set the saucepan over medium heat until the water reaches 150 to 160 degrees F and small bubbles appear around the sides of the pan, 9 to 10 minutes.
Remove the kombu from the pan. Increase the heat to high and bring to a boil, 5 to 6 minutes. Reduce the heat to low and add the bonito flakes. Simmer gently, stirring frequently, for 10 minutes.
Strain the liquid through a fine mesh strainer lined with muslin or several layers of cheesecloth. Reserve the bonito flakes for another use.
For long term storage, place in an airtight container in the refrigerator. Use within 1 week or freeze for up to a month.
Gari – Pickled Ginger
Mostly known for its use as a condiment in sushi dishes, it has a great sweet zingy taste.
So easy to make and will last under refrigeration for a long time.
Ingredients…
6 ounces fresh ginger ¼ cup plus 1 Tbsp sugar 1 Tbsp sea salt 6 Tbsp plain unseasoned rice wine vinegar
Directions…
– Peel ginger and slice very thin, almost see through.
– Put ginger in a bowl with
– ¼ c of sugar and 1 Tbsp salt and mix together and let sit for 30 minutes.
– Boil enough water in a pot to cover the amount of ginger and cook the now marinated ginger slices in it for 45 seconds and drain through a strainer.
– Put hot ginger slices in a jar.
– Boil the rice vinegar and sugar together and pour over the ginger.
– Let sit out on the counter for 24 hours.
– Place jars into the refrigerator and leave at least 1 week before tasting. Taste will improve with time; a month in the fridge does well. It will keep well for 6 months.
We hope you have enjoyed learning some new recipes that will make any meal tastier no matter if you’re a vegan, veggie, or meat eater.
Many of the items can be fermented, if one likes, or ingredients can be cultured, too
Looking for something different to drink this summer…try our some traditional fermented beverages…Enjoy!
Traditional Lactose-Fermented Beverages…
Bouza (Egypt): An opaque drink made of wheat, water, and sourdough yeast starter.. Gv-No-He-Nv (Cherokee, Native American): A thick, milky drink with the sweet flavors of corn accented by a mild sourness. T’ej (Ethiopian): A simple honey type wine/mead. Braga (Middle Europe): A fermented gruel or sour porridge. Chicha (South America): A clear, bubbly beverage made with corn. Balls of cooked corn mush are chewed and inoculated with saliva, then added to water and allowed to ferment. The taste is similar to kombucha. Kiesel (Russia and Poland): An important grain-based lacto-fermented drink. Kvass (Russia and Ukraine): A lacto-fermented drink usually made from stale rye bread. Another version is made with beets. Mead (Europe): Made from honey, water, and wild yeast. Some methods produced a lacto-fermented drink, very low in alcohol or bottled and aged for more alcohol content. Munkoyo (Africa): A low alcohol lacto-fermented brew made from millet or sorghum. Also called sorghum beer, consumed in large quantities by field workers and at celebrations. Given to babies to protect them against infection and diarrhea. The missionaries to Africa discouraged its use because it contains alcohol in very small amounts. Tesguino (Mexico): A low-alcohol beer made with sprouted corn. Chicha (Andean, Peru): Chewed corn beer having a light, delicious corn flavor. Pulque (Mexico): A lacto-fermented drink made from the juice of the agavé cactus. With time, it goes alcoholic. Palm Wine (Africa): The lacto-fermented sap of the palm tree, consumed in tropical areas of Africa and Asia. Rice Beers (Asia and India): These were traditionally very low in alcohol, and mostly lactose-fermented. In Japan, koji rice mold is used for making sake, amasaké, and simple grog’s.
Today we’ll talk about kvass, a traditional beverage from Russia, drunk for good health and to give energy. All classes of people enjoyed this beverage from the czars as well as by peasant folk. Traditional, kvass is sold on the street by vendors with a large tank full of fresh kvass.
In wealthy households, various kinds of kvass contained rye bread and/or currants, raspberries, lemons, apples, pears, cherries, bilberries and loganberries. The possibilities and combinations of breads and fruits are endless!
So What Makes It Kvass?
Kvass starts from stale sourdough rye bread so it was natural for bakeries to make it from the bread that they do not sell.
Bread that has gone past its shelf life is cut into 1-inch cubes, spread on trays and dried out in the bread ovens, set to low temperature. Then the pieces are added to a 200-liter tank filled with good quality water. This brews for 12 hours at room temperature. Yeast and a small amount of sugar is then added and the kvass is left another 12 hours at room temperature.
The kvass is then bottled. Three or four raisins are added to the bottles, which are then capped tightly. The kvass will be ready in about three weeks—foamy and refreshing. However, the shelf life from that point is only about one week (or three weeks refrigerated), after which the kvass turns alcoholic. The short shelf life has left this beverage pretty much untouched and unadulterated by commercial food/beverage companies.
Beet Kvass
Another type of kvass is made from beets. Not as epicurean as medicinal, although beet kvass is often added to borscht, which is a great cold RAW soup. Traditional Ukrainian homes have it at the ready for a pleasing, sour flavor added to soups and vinaigrette.”
Folk medicine values beets and beet kvass for their liver cleansing properties and beet kvass is widely used in cancer therapy in Europe. Anecdotal reports indicate that beet kvass is an excellent therapy for chronic fatigue, chemical sensitivities, allergies and digestive problems.
Making Kvass at Home…
Homemade Kvass
Kvass made at home requires careful attention to detail, especially to temperatures. To avoid failures and frustration, purchase a thermometer that will measure liquids between 50-175 degrees F. You will also need to find a warm place that stays about 76-78 degrees in your kitchen or in a closet. We use a preheated room for brewing ferments such as these.
Be sure to use bread that is made only with rye flour, and that contains no food additives or preservatives. Kvass made from bread that contains oats or other grains is not used as it turns the fermenting liquid bitter.
Do not worry about using white sugar, as most it will brake down and turn into beneficial acids.
The kvass should be stored in bottles with screw on tops or tops with wire fasteners. This recipe makes about 5 quarts.
– 1 pound rye bread, cut into 1/4-inch slices
– 1 1/2 cups sugar, in all
– 1 package dry active yeast or a fresh sourdough starter if you
maintain one
– 1 tablespoon unbleached white flour
– Filtered water
– About 1 dozen raisins
Spread the bread on cookie sheets and bake for about 30 minutes at 250 degrees F. When cool, chop into 1/4-inch pieces in a food processor.
Bring 4 quarts of water to a boil and then cool to 175 degrees. Add the bread, stir well, cover with a lid and leave in a warm place (76-78 degrees) for 1 hour. Strain and reserve both the bread and the liquid.
Bring another 2 1/2 quarts of water to a boil, cool down to 175 degrees and add the reserved bread. Cover with a lid and leave in a warm place for 1 1/2 hours. Strain and discard the bread. Combine both batches of liquid.
Next is to make simple syrup: Place 1/4 cup sugar and 1-tablespoon water in a small cast-iron skillet. Stir continuously over heat until the mixture turns golden brown, but do not caramelize. Remove from heat and gradually blend in 1/2 cup of the reserved liquid. Then stir this mixture into the entire batch of liquid.
In a small saucepan, place 1 cup water and the remaining 1 1/4 cups sugar. Bring to a boil, lower the heat and simmer for 10 minutes, skimming once or twice. Stir this syrup solution into the reserved liquid and allow the mixture to come to room temperature (about 75 degrees).
Mix the yeast with the flour and combine with 1 cup of the liquid. Return this yeast mixture to the pot. Make an X of masking tape across the top of the pot. Cover the pot with two layers of cheesecloth or a clean kitchen towel and leave in a warm place (73-78 degrees) for 8-12 hours or overnight. Cool the kvass to about 50-54 degrees. Transfer to bottles, seal tightly and refrigerate for 24 hours. The kvass will keep in the refrigerator for 2-3 days.
In addition to its role as a refreshing drink, kvass is traditional added to a number of typical Russian cold soups containing vegetables, sour cream and fish.
Kvass update on recipe and results…#2
This was the first time making kvass, turned out pretty well.
The beet kvass is very fizzy, however, the traditional kvass has more depth of flavor!!!
Both have their own benefits, so try making both! This is a low cost way to include pro-biotics into your body.
Beet Kvass (L) and Traditional Kvass (R)
Beet Kvass (L) and Traditional Kvass (R), Ready to Drink !
Other Traditional Lactose-Fermented Beverages…
Bouza (Egypt): An opaque drink made of wheat, water, and sourdough yeast starter.. Gv-No-He-Nv (Cherokee, Native American): A thick, milky drink with the sweet flavors of corn accented by a mild sourness. T’ej (Ethiopian): A simple honey type wine/mead. Braga (Middle Europe): A fermented gruel or sour porridge. Chicha (South America): A clear, bubbly beverage made with corn. Balls of cooked corn mush are chewed and inoculated with saliva, then added to water and allowed to ferment. The taste is similar to kombucha. Kiesel (Russia and Poland): An important grain-based lacto-fermented drink. Kvass (Russia and Ukraine): A lacto-fermented drink usually made from stale rye bread. Another version is made with beets. Mead (Europe): Made from honey, water, and wild yeast. Some methods produced a lacto-fermented drink, very low in alcohol or bottled and aged for more alcohol content. Munkoyo (Africa): A low alcohol lacto-fermented brew made from millet or sorghum. Also called sorghum beer, consumed in large quantities by field workers and at celebrations. Given to babies to protect them against infection and diarrhea. The missionaries to Africa discouraged its use because it contains alcohol in very small amounts.
Tesguino (Mexico): A low-alcohol beer made with sprouted corn. Chicha (Andean, Peru): Chewed corn beer having a light, delicious corn flavor. Pulque (Mexico): A lacto-fermented drink made from the juice of the agavé cactus. With time, it goes alcoholic. Palm Wine (Africa): The lacto-fermented sap of the palm tree, consumed in tropical areas of Africa and Asia. Rice Beers (Asia and India): These were traditionally very low in alcohol, and mostly lactose-fermented. In Japan, koji rice mold is used for making sake, amasaké, and simple grog’s.
We hope you enjoy this Blog post on Kvass, a simple to make fermented beverage for health and well-being.
Come see our culture store for many new starter cultures and our main page for cultured foods recipes.
Live, Grow, Share Cultured Foods.
Dozens for cultured food starters all freshly package…
http://store-organic-cultures.com
Culturing information, online instructions, and recipes…


 These condiment sides are a great way to enhance a meal or dish. Very easy to make and uses only a few ingredients. The Japanese use many of these condiment sides every day and most contain minerals and micro-nutrients that normal


 Not really a condiment as it is used as a base, to build other flavors from. Used in many traditional Japanese dishes for that great added layer of flavor, called umami. Simple to make, but it adds a lot of flavor to a dish. Vegans and veggies can just make a seaweed and veggie dashi vs. using the bonito flakes.
 Looking for something different to drink this summer…try our some traditional fermented beverages…Enjoy!


 Kvass update on recipe and results…#2
