A simple soup that can be enjoyed by everyone, classic is wakame seaweed and beef. However, several types of meat can be used including beef, chicken, mussels, or even tofu.
This staple soup also is the soup that new moms eat for the first few weeks after giving birth because of the nutrients contained in miyeok that help with recovery and the production of breast milk. In Korea, this soup is part of the hospital diet for new moms.
Ingredients
1.5 ounces dried miyeok yields about 3 cups soaked
5 ounces beef stew meat or brisket
2 teaspoons minced garlic
2 tablespoons soup soy sauce gukganjang
1 tablespoon sesame oil
salt and pepper to taste
10 cups of water
Wakame seaweed
Instructions
Soak the dried miyeok for about 30 minutes. Rinse 2 or 3 times thoroughly. Drain after each rinse, and squeeze or knead (as if you are working with bread dough) to remove excess salt used in the drying process and rinse off any hidden sand. Drain well, and cut into bite sizes.
Cut the beef/meat into thin bite size pieces. Marinate with 1 tablespoon of soup soy sauce, garlic, and a pinch of pepper.
Heat a large pot over medium high heat. Sauté the meat with the sesame oil just until the meat is done.
Add the miyeok and 1 tablespoon of soup soy sauce, and continue to sauté for 4 to 5 minutes.
Add the water, and bring it to a boil. Skim off any scum. Add salt and pepper to taste. Lower the heat to medium low. Boil, covered, for 20 to 30 minutes until the meat is tender and the broth is slightly milky.
We use a mix of different sea vegetables including wakame, raw sheet nori, hijiki, and fueru wakame. But feel free to use what is on hand. The seaweed can be slightly fermented for 12 hrs to add probiotics.
Using a fermented salt product verses using plain sea salt in dishes using a salt that has been added to a fermented product allows the use of sea salt and the benefits of cultured/fermentation.
Shio Koji…
We use shio-koji instead of salt in almost all of our cooking now, so it goes pretty quickly. Easy to make with 3 ingredients… rice koji, sea salt, and filtered water. This is a very salted product as salt should be the amount of salt may be reduced or more water added.
Here is the recipe for shio-koji. It only takes about 15 minutes to prepare and then a little more than a week to ferment:
500 gm fresh rice koji
170 gm sea salt
650 cc water
Put the koji in a bowl and rub with your hands to break apart any clumps.
Add the salt and mix with your hands, kneading the salt and koji together. Myoho always emphasizes that it’s important to put your heart into mixing the shio-koji- think positive thoughts and give appreciation for the koji- the finished product will be more delicious and satisfying.
Mix until the mixture becomes slightly sticky and it clumps when squeezed.
Add the water and stir well.
Put in a loosely lidded container and let it sit at room temperature for 10-14 days until the rice grains become smaller and the mixture has a slightly salty sweet aroma. Stir the mixture well once a day. Here is the full Blog post for making shio koji.
Salted Black Beans…
Next we have salted black beans. Called Chinese douchi – Fermented Black Beans in China. Use this condiment in many recipes especially Latin inspired dishes like tacos, burritos, or even nachos. It includes Chinese black beans or standard black beans, rice koji, and sea salt of your choice. Ratio is 4 parts beans, 1 part rice koji, and sea salt at a rate of at least 3% by weight. Feel free to use more sea salt if desired or even better use fresh made shio koji(salt koji).
The beans can be left whole or mashed into a paste.
We hope you will use these wonderful recipes vs. plane sea salt. See more at Organic-Cultures Blog for shio-koji and mock dry aged steak.
Today we’ll look at a fast and easy condiment from Japan made from umeboshi plums, shiso leaf, mirin, and malted koji rice.
Use for a topping on rice dishes, sushi, or anywhere a sweet-sour- salty fermented taste is desired.
Use umeboshi paste to replace salt in dressings, spreads, and sauces or to season soups, grains, and vegetables. Umeboshi is a fermented raw food that will keep indefinitely at room temperature and inhibit the growth of harmful bacteria. Shiso leaf (perilla) contains the bioflavonoid anthocyan, a powerful antioxidant. When combined with tart ume plums, they give umeboshi their red color and serve to ward off harmful organisms.
Ingredients Needed…
– 6 to 10 Japanese umeboshi plums. Most umeboshi plums accesable in the USA are going to be pickled in rice vingar. This is fine as it will help drop the pH to the acidic side. Other types of plums could be used, too.
– Fresh red shiso leaf (perilla), one bunch
– Mirin or sugar to taste
– 1 to 2 tbsp malt rice koji or white miso
Malted Rice Koji
Directions…
– Start by quickly sauteing the shiso leaf in a little water until wilted.
– Add the plums and sautee for about a minute. Retain the liquid. Allow mixture to cool to room temperature before adding the unpasteurized rice koji or miso.
– Now take the umeboshi plums and shiso leaf and add the miso paste or rice koji. We recommend using malted rice koji for better ferment and less salt use.
– Once fermented to one’s liking, blend the contents until it has the proper consistency and flavor.
– Pack this mixture into a sterilized container and allow to ferment at room temperature for 3 to 5 days. The fermentation time can be longer if desired.
Just like miso, the finished product is room safe or may be kept in the refrigerator.
~ VEGAN, RAW, GLUTEN-FREE MACROBIOTIC ~
Rice porridge with plum
Sushi rice w/ plum sauce
Nori rice cake
This smooth, ruby red puree is a convenient kitchen delight as well as high-quality food. Spread it on sushi rolls, corn-on-the-cob; use it in tofu dips and salad dressings for a wonderfully tart, sweet-sour-salty flavor.
As fermented and cultured foods are becoming more popular …being served more in Western restaurants, on store shelves, and home pantries. But one that might not be very familiar is koji rice.
Mainly because it’s a fermented food that’s hiding inside another fermented food.
Today, we will introduce some different ways to use koji rice in recipes and dishes:
–Shio Koji or Koji Salt
– Mock Dry Rub Steak
– Amasake Rice Beverage
Koji rice is steamed rice that has been inoculated with Aspergillus oryzae, a mold that ’s widespread in Japan. The mold releases enzymes that ferment the rice by decomposing its carbohydrates and proteins. This process can also be applied to other
grains like barley or soybeans.
To make koji rice, the mold culture Aspergillus Oryzae is added to the cooked sushi rice. The rice kernels are then placed in wooden trays and left to ferment in a warm, humid environment
for up to 50 hours.
The result is essentially molded rice, but don’t be put off by it immediately. What makes koji so special is that it digests starches and proteins and breaks them down into sugars and amino acids. The taste of the finished malted rice is sweet. Because of this, it can be used as a starter for a number of fermented Japanese food products, including amasake, mirin, sake,
shoyu soy sauce, and miso.
Shio Koji (塩麹, 塩糀) – A century-old natural seasoning used in Japanese cooking to marinate, tenderize, and enhance umami flavor of a dish.
It’s made of just a few simple ingredients: salt, water, and rice koji.
You can use shio koji to marinade meats, make pickles, flavor your vegetables or use it as a salt substitute. In a recipe that calls for one teaspoon of salt, you can substitute with 2 teaspoons of shio-koji. Shio-koji is really versatile and can be used in any kind of cooking.
~ Benefits of Shio Koji ~
Because it is a fermented ingredient, shio koji is known for its many health benefits, which includes:
A natural pro-biotic seasoning
Tenderizes food
Brings out the umami and sweetness in foods
Reduces the intake of salt
Aids in digestion
Clear the skin
Anti-aging
Contains minerals, fiber and vitamins
Shio Koji Recipe
What is needed to get started…
– 375g fresh koji rice
– 110g sea salt, 30% of the weight of the koji
– 560ml good quality water
First, wash your hands and sanitize a glass or metal container. Then rub the koji rice and salt between the hands mixing thoroughly.
Add the water to the shio and stir.
Cover and keep in a warm place around 27 to 37 Deg C. Stir twice a day for 1 to 2 weeks. The amount of time can vary with the summer or winter temperature.
Now you can use the shio koji rice in many Japanese style dishes. You can marinade meats, make pickles, or just use your shio-koji as a salt substitute. Shio-koji is incredibly versatile and can be used in any kind of cooking. It will keep in the refrigerator for a good amount of time remembering to label & date. – Fin
~ Mock Dry-Aged Shio Koji Steak ~
Here’s a quick way of dry aging a steak without the time or higher prices for real dry aged. This method seems to be taking storm in the USA.
Dry-aged meat is amazing and certainly worth buying when you can afford it. However, a “mock” dry aging that tastes just as good as dry-aged meat, for a considerably smaller price tag and shorter time frame.
What is Needed…
– Steak, any cut desired, cheaper cuts seem to be a better deal.
– Koji rice, enough to cover the steak, purchase here or make your own koji rice.
– Time of about 2 to 3 days
Start by prepping and trimming the steak, if needed. The koji rice can be ground up into a powder or left as whole grains. Rub all sides of the meat (Use cheaper steak cuts for best results) generously and then let it sit uncovered on a wire rack in the fridge for 2-3 days. Don’t allow to sit too long or the meat starts to get too tough and begins to almost cure. After 12 hours, the meat starts to look like a moist, snow-covered slab of steak. The aroma is just as rich and nutty with a touch of sweetness, just as a steak that’s been dry-aging for over a month.
Before cooking, rinse the meat thoroughly in cold water to remove all the koji, then pat dry. Next, season the meat with salt and sear it in a cast-iron pan or cook normally. The dry-aged rubbed steak will caramelize and pick up color much faster than a normal steak. – Fin
~ Sweet Amasake Rice Beverage ~
Used in Japan as a sweetener, beverage, or a simple alcoholic drink. Amazake is one of the best known cultured and fermented items from Japan. There are several recipes for amazake that have been used for hundreds of years. By a popular recipe, kōji is added to cooled whole grain rice causing enzymes to break down the carbohydrates into simpler unrefined sugars. As the mixture incubates, sweetness develops naturally. By another popular recipe, sake kasu is simply mixed with water, but usually, sugar is added.
In this recipe, amazake becomes low-alcohol beverage if given time.
Amazake can be used as a dessert snack, natural sweetening agent, food for infants, added in salad dressing or smoothies. The traditional drink (prepared by combining amazake and water, heated to a simmer, and often topped with a pinch of finely grated ginger) was popular with street vendors. It is still served at inns, tea houses, and at festivals.
Many Shinto shrines in Japan provide or sell it during the New Year!
What is Needed…
– 3c cooked brown rice
– 1c of malted koji rice. If koji rice is needed…order here
Yield: 4 cups of fermented rice to use as a sweetener or 3 quarts Amazaké drink
Incubation Temperature: 120-140 F (50-60C)
Start by cooking the brown rice and allowing it to cool to at least 120 F (50C). Once cooled, stir in the koji rice and mix well. Place mixture into a glass or stainless steel container that will allow an inch of “headroom” to allow for expansion during the fermentation process. Cover container and incubate, stirring every couple of hours to prevent heat buildup. The finished product can take as little as 6 hours with quality, fresh (not dried) koji-kin at optimum temperatures after 6 hours start tasting the ferment to see if the cycle is complete.
When finished the ferment should thicken like porridge with a mild sweet taste. The sweetness will increase up to a point after which it will change and start to become sour. Once the taste is to your liking, place into a saucepan and bring to a boil. Reduce the heat and simmer for 3 to 5 min., stirring frequently. Boiling will stop the fermentation process keeping the amazaké sweet. For a smother amazaké consistency purée the mixture in a blender until smooth. Refrigerate any ferment not used right away. If not, the amazaké will become very sour. A little fresh ground ginger may also be added.
Use the finished product to make a non-sugar sweetener, a beverage, even a simple grog called, Doburoku ( どぶろく or 濁酒 ).
– Fin
We hope you have enjoyed finding new ways of using fermented and cultured foods. See our store for more items like rice koji, spores, and accessories. Store.Organic-Cultures.Com
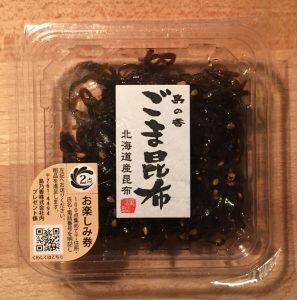
5 Fermented Recipes for Classic Sea Vegetable Japanese Condiments
Tsukudani (佃煮) is small seafood, meat or seaweed that has been simmered in soy sauce and mirin.
High osmotic pressure preserves the ingredients.
Its name originates from Tsukudajima, the island (in present-day Chūō, Tokyo) where it was first made in the Edo period. Many kinds of tsukudani are sold. Traditionally made tsukudani is preservable and has been favored as a storable side dish in Japanese kitchens since the Edo period.
Tsukudani can be made with kombu, nori, or wakame seaweeds. It is usually eaten with steamed rice as a flavoring agent since the flavor is very intense (approximately 1 tbsp for one bowl of rice). Finished tsukudani is served chilled from the refrigerator where it takes on a gelatinous texture.
Here are some simple to make Japanese condiments. All of the raw nori seaweed is ground, mixed with other ingredients, and then slightly fermented for 2 to 3 days. Then keep jars in the refrigerator for longer shelf life. We like to use smaller jars like 1/2 pint size for a fresher product and ease of table use.
Make these fresh healthy seaweed condiments to enhance plan rice or other entrees.
– Gohandesuyo, Seaweed Paste
Nori seaweed with shoyu and dashi broth
Simple to make by grinding nori sheets then adding shoyu soy sauce and dashi broth until the desired consistency is obtained. Add a bit of water if needed to make a thick paste.
Mix all the ingredients and pack into jars. Ferment for 2 to 3 days at room temperature then
place in refrigerator.
– Red Pepper, Nori Seaweed Paste
Nori seaweed with chili oil
Make the same as Gohandesuyo with the addition of chillis to your liking. You can buy a premade chili paste or make it fresh. The amount of chili to nori can vary by the type of pepper used and taste.
Add a bit of water if needed to make a thick paste.
Mix all the ingredients and pack into jars. Ferment for 2 to 3 days at room temperature then
place in refrigerator.
– Umebosi Pickled Plum Nori Tsukudani
This condiment is nice and sweet from the plumbs and contains a depth of flavor from the shiso.
Again make as you would gohandesuyo but now mixed with umeboshi plums/paste and fresh shiso leaf. Mix all the ingredients and pack into jars. Ferment for 2 to 3 days at room temperature then
place in refrigerator.
Yuzu Kosho Tsukudani
Yuzu lemon peel and chilis are added to the basic nori seaweed paste…
Start with grinding the nori sheets and adding yuzu peel and chili to taste. Mix all the ingredients and pack into jars. Ferment for 2 to 3 days at room temperature then place in refrigerator.
Taberu Rayu Tsukudani
Chili oil with fried onions and garlic…
Start by frying off onions in sesame oil then add the garlic and fry till all ingredients are finished. Remove from heat. Now add in the chili oil to form
a thick paste.
The ratio is about 2 parts onions to 1 part garlic and 1 part chili oil. Of course, this can be changed to your liking. A little soy sauce and sugar can also be added. Mix all the ingredients and pack into jars. Ferment for 2 to 3 days at room temperature then
place in refrigerator.
Other flavor types to try…
– Kameya Wasabi Nori Seaweed Tsukudani
– Nori Tsukudani Shijimi(clams) Seasoned
– Yasuda Yakinori Iri Tsukudani (Nori in sweet shoyu)
Try it with different meat, seafood, or othe types of sea vegiables.
Condiments can enhance dishes and provide healthy flavors to dishes. Have fun making these delightful additions to meals.
Rice wine, also known as mijiu, is an alcoholic drink made from sticky rice, traditionally consumed in East and Southeast Asia, and also South Asia. Rice wine is made from the fermentation of rice starch that has been converted to sugars, which in turn produces alcohol. Microbes are the source of the enzymes that convert
the starches to sugar.
Rice wine typically has an alcohol content of 18%–25% ABV.
Rice wines are used in Asian gastronomy at formal dinners
and banquets, but many types are used in cooking.
They are also used in a religious and ceremonial context.
Best known rice wine types are Japanese mirin, mageolli a milky traditional wine from Korea, and of course Japanese sake. Sake is the most widely known type of rice wine in North America because of its ubiquitous appearance in Japanese restaurants.
There are many other types of wines produced from rice with each country and area having it’s own style of wine. Many types come from China and lesser known traditional styles are from Korea, Philippines, India, and smaller tribes from Asia.
We offer three types of rice wine starter kits. Easy to make and enjoy for the holidays. Most starters make 1L of wine and takes about a week to produce. Happy Brewing!
Looking for a new way to ferment vegetables?
Something quick and easy to make fermented pickles that are a great condiment to any meal. A Nuka bed offers a way to get lactobacillus bacteria and wild yeast, without having to vent
or clean up exploding glass jars!
It makes a great RAW, fermented/cultured, and vegan condiment.
What is a Nuka ‘Bed’?
Nukazuke (糠漬け) are a type of Japanese pickle, made by fermenting vegetables in rice bran (nuka). Almost any edible vegetable may be pickled through this technique, though traditional varieties will include eggplant, Japanese radish (daikon), cabbage, and cucumber. The taste of nuka pickles can vary from pleasantly tangy to very sour, salty and pungent. These pickles also retain their crispness which adds to their popularity.
Fish nukazuke is also common in the northern part of Japan.
Sardines, mackerel, and Japanese horse mackerel are frequently used. Some people pickle meat in nuka-bed, too.
If pickling meats, use a separate nuka bed and not the bed for vegetables.
The nuka-bed is traditionally kept in a wooden crock but ceramic crocks or even plastic buckets are also common. Many Japanese households have their own nukazuke crocks which are faithfully stirred by hand every day. Due to varying methods and recipes, flavors vary considerably, not only from region to region, but also from household to household.
Pickles (tsukemono) are an important staple of Japanese cuisine, and nukazuke are one of the most popular kinds. They are often eaten at the end of a meal and are said to aid in digestion. The lactobacillus in nukazuke pickles may be a beneficial supplement to the intestinal flora. They are also high in vitamin B1.
How to Make Your Own Nukazuke Pickle Bed
RAW – Vegan – Gluten Free
Japanese Pickles Ready to Eat
Needed Ingredients…
– Rice Bran, no-GMO and/or organic – 20 oz
– Kombu Seaweed – one leaf, cut into very small pieces
– Sea Salt – 1/4 cup or to taste
– Korean Chili Flakes – 1/8th to 1/4 tsp
– Dried Citrus Peel – 2 tbsp
– Dried Bonito Flakes – 1/8 to 1/4 cup – Optional – Fresh lemon or lime juice – enough to cover top of nuka bed – Condiments or veggies of your choice – Keep whole – Also, for a new starter bed add some fresh fruit like apples
– A fermenting vessel – lead free
Directions…
Note: It needs to be stored under refrigeration after opening to avoid mold. Storage term: 12 month (This usable time is only a guide. If you stir well NUKA-BED with your hand once every 2-3 days, add extra NUKA rice bran and salt as necessary, it can be used semi-permanently.)
If you are using the nuka kit purchased from us, you will receive two packets. The larger pack is the rice bran and flavorings. The smaller packet is the Nuka starter with fresh sliced fruit.
1. Start by opening the large packet or mixing the above ingredients together and adding enough filtered water (no city tap water please) to make a thick paste. Add the water in small amounts until the correct thickness is obtained. The bed should be like a thick paste.
Over time, the addition of the vegetables will add water to the mixture and more fresh rice bran and salt will be needed.
2. Now add the small packet that contains the nuka starter and fresh fruits. If making your own nuka bed, add some slices of fresh cut organic or wild apples (this adds wild yeast and wanted bacteria).
Mix in the nuka starter by hand until well blended. Also, when starting a new nuka bed from scratch, it will take time for the bacteria and yeast to grow through the bed and become 100% active. The lemon juice will help with retarding mold growth. Note: It is important to mix the bed by hand to spread wanted bacteria within the bed mixture.
3. Add the vegetables that you wish to pickle. Common choices are roots like burdock and carrots, small eggplant, Japanese radish (daikon), cabbage, and cucumber. We like doing radishes and cucumber!
Rub the vegetables with sea salt then place into the nuka vessel pushing them down to cover with the rice bran mixture. Sprinkle the top of the bed with the lemon juice and more salt.
4. Allow the vegetables to sit in the nuka bed for 3 to 5 days. Culturing time may vary depending on the vegetables used and temperature. The taste will move from tangy to very sour the longer the pickles set in the nuka. Do not ferment at room temperature during the hot summer months or the bed may become contaminated with molds.
Daily Hand Mixing nuka bed
Mix by hand each day making sure to replace the vegetables under the rice bran. Salt may be sprinkled over the top to help retard mold growth, too. Once complete and to your liking remove the nuka pickles, slice, and serve. Start a new batch or place fermenting vessel in the refrigerator keeping it mixed to prevent mold growth.
Enjoy this method of making great quick pickles without the mess of multiple jars, airlocks, weights, and other unnecessary items. The taste and flavor of the cultured nuka vegetables is second to none! If you want a premixed nuka bed, we have them available in traditional or vegan, at our web store – store.organic-cultures.com
Nattō (なっとう or 納豆?) is a traditional Japanese food made from soybeans fermented with Bacillus subtilis var. natto. Some eat it as a breakfast food. Nattō may be an acquired taste because of its powerful smell, strong flavor, and slimy texture. In Japan, nattō is most popular in the eastern regions, including Kantō, Tōhoku, and Hokkaido.
Before Making NATTO:
Be sure the entire processing area is cleaned for production. Make sure all utensils, pots, cheesecloth (FUKIN), etc. are as sterile as possible. (Boil utensils for 5 minutes prior to using.)
The packet of NATTO spores comes with a special small spoon; be sure to use the small spoon to measure the appropriate quantity for the recipe.
The fermentation process requires the NATTO be kept at approximately 100°F (37°C) degrees for 24 hours. Ovens with a low temperature setting can be used, an oven w/ light on only, or inoculate in large cube-shaped food dehydrators.
NATTO is quite odorous while fermenting, and you may want to isolate the fermenting NATTO during this time.
Ingredients and Supplies needed for Making NATTO:
2 pounds (900g) soybeans (about 4 cups)
10cc water, boiled for 5 to 10 minutes to sterilize
One spoonful (0.1 g.) NATTO-kin spores (use the special spoon that came with the packet)
Cheesecloth or butter muslin (FUKIN in Japanese)
Non-reactive pot (i.e., stainless steel, enameled, ceramics, etc.) or Pressure cooker
Large stainless steel, wood, or plastic spoon or spatula
3-4 oven-proof glass containers with lids
Instructions for Making NATTO:
– Wash the soybeans using running water to gets rid of tiny dirt or dead skins off the beans.
Washing the Soaked Soy Beans
– Soak with clean water for 9 to 12 hours (longer soaking time recommended during colder months). Be sure to use approximately 3 parts water and 1 part soybeans to allow for expansion. You will end up with 8 to 12 cups of beans.
Draining Soy Bean for Steaming/Boiling
Drain the beans from the soaking water. Place beans in a large pot with mesh bowl and pour in water. Steam it for 3-4 hours. Or fill with water and boil 5-6 hours. The recommended way is to use a “Pressure cooker”, that can be cooked faster than in a normal pot. Please refer to the pressure cooker instruction manual for operation guidelines.
Steaming Soy Beans for Natto-Kin
– Drain the cooked beans and place in a sterilized pot. Dissolve 1/5 special spoonful of NATTO spores (0.1g) into 10cc of sterilized water (or mix by package directions).
Types of Natto Spores From Japan
– Immediately pour the NATTO spore solution over the beans while the beans are still warm but not hot to the touch. Stir the beans and water mixture together carefully using a sterilized spoon/spatula.
Inoculation With Natto Spores
– Place a thin layer of beans in each of the 3 to 4 containers. If at any point during the process some beans are spilled on the counter, etc., discard the spilled beans as they can contaminate the other beans if added back in to the batch.
Natto Being Packed into Serving Trays
Place the sterilized cheese cloth over the top of the containers and place the tight-fitting lid over the cheese cloth. Preheat the oven, dehydrator, or KOTATSU Japanese Warmer to 100°F (37°C). Place the covered containers in the oven, dehydrator, or warmer and allow the NATTO to ferment for 24 hours being sure to keep the temperature steady at 100°F (37°C). Check the temperature throughout the day/night.
Inoculation Time !
At the conclusion of the fermentation period, let the NATTO cool for a couple of hours, then remove the lid and the cloth, replace the lid, and store the containers in the refrigerator at least overnight.
NATTO can also be aged in the refrigerator for 3-4 days. Smaller portions of finished NATTO can be stored in the freezer and thawed for later use.
Ready to Eat…YUM!
Need Natto spores fresh from Japan? We have them in our store with many other types of food culturing spores:
These condiment sides are a great way to enhance a meal or dish. Very easy to make and uses only a few ingredients. The Japanese use many of these condiment sides every day and most contain minerals and micro-nutrients that normal
salt and pepper cannot compare.
Seaweed Furikake (Nori Fumi Furikake)
In Japan, Furikake is a popular table seasoning that comes in a variety of flavors.
Nori fumi furikake, meaning seaweed flavored furikake, is a very popular flavor, and for good reason! It’s a classic combination used on plain rice, for a cheap meal. Just a sprinkle gives the perfect boost of flavor for rice, noodles, soup, or other dishes!
How to use furikake besides adding to white rice? Try using Japanese furikake with any recipe that calls for shredded nori on top.
Ingredients…
1/4 cup white sesame seeds
1/4 cup black sesame seeds
2 sheets nori seaweed
1 teaspoon sea salt
1 teaspoon sugar
Directions…
– Start by grinding the black and white sesame seeds. Add the sea salt and sugar, grind until texture is correct.
– Next, toast the nori over an open flame for a few seconds, if not already toasted.
Cut nori sheet into long thin strips. Now layer several strips and fold over 2 or 3 times. Cut the folded nori into very tiny strips. For better looks, cut the nori into very small pieces vs. grinding/blending them up.
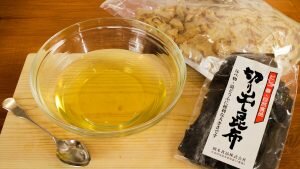
Shichimi Togarashi, Japanese Seven Spice
Shichimi Togarashi
With the expanding appreciation of Japanese cuisine here in this country, there is a need to incorporate the seasonings needed to create and enhance them as well. This seasoning is popular in Japan and used to add both heat and flavor to dishes such as soba noodles, udon, beef tataki, jasmine rice. The heat of this seasoning, unknown in most Japanese cuisine, is just a little. So there is just a hint. Hand mixed from orange peel, black, white and toasted sesame seeds, cayenne, ginger, Szechwan pepper and nori.
Ingredients…
1/8 c – Orange/tangerine peel, dried
1/8 c – Black sesame seeds
½ c – Toasted white sesame seeds(dehulled)
– Toasted nori – 2 sheets
– Japan or Korean chili, to taste
– 1/8 or 1/2 teaspoon – Dried ginger root
– Szechwan pepper, to taste
– Optional, one may add hemp seeds and shiso to the mix
Directions…
Start by grinding the orange peel, black/white sesame seeds, ginger, pepper, and chilies.
Once your happy with the grind and flavor, next is to add the nori sheets
Toast the nori over an open flame for a few seconds, if not already toasted.
Cut nori sheet into long thin strips. Now layer several strips and fold over 2 or 3 times. Cut the folded nori into very tiny strips. For better looks, cut the nori into very small pieces vs. grinding/blending them up.
Yukari Shiso Salt – Yaki Onigiri
This is very easy and no recipe is really needed… Ingredients…
– Shiso leaf, dried, ground
– High quality sea salt, ground
Directions…
Mix 1/3c shiso leaf with 2/3c sea salt
Place in sealed container for long term storage
Dashi
Not really a condiment as it is used as a base, to build other flavors from. Used in many traditional Japanese dishes for that great added layer of flavor, called umami. Simple to make, but it adds a lot of flavor to a dish. Vegans and veggies can just make a seaweed and veggie dashi vs. using the bonito flakes.
Ingredients…
– 2 (4-inch) square pieces kombu – 2 1/2 quarts water – 1/2-ounce bonito flakes or katsuobushi, about 2 cups
Note: For vegans make a vegetable broth w/ carrots, onions, seaweeds, garlic, and shiitake mushrooms
Directions…
Put the kombu in a 4-quart saucepan, cover with the water and soak for 30 minutes.
Set the saucepan over medium heat until the water reaches 150 to 160 degrees F and small bubbles appear around the sides of the pan, 9 to 10 minutes.
Remove the kombu from the pan. Increase the heat to high and bring to a boil, 5 to 6 minutes. Reduce the heat to low and add the bonito flakes. Simmer gently, stirring frequently, for 10 minutes.
Strain the liquid through a fine mesh strainer lined with muslin or several layers of cheesecloth. Reserve the bonito flakes for another use.
For long term storage, place in an airtight container in the refrigerator. Use within 1 week or freeze for up to a month.
Gari – Pickled Ginger
Mostly known for its use as a condiment in sushi dishes, it has a great sweet zingy taste.
So easy to make and will last under refrigeration for a long time.
Ingredients…
6 ounces fresh ginger ¼ cup plus 1 Tbsp sugar 1 Tbsp sea salt 6 Tbsp plain unseasoned rice wine vinegar
Directions…
– Peel ginger and slice very thin, almost see through.
– Put ginger in a bowl with
– ¼ c of sugar and 1 Tbsp salt and mix together and let sit for 30 minutes.
– Boil enough water in a pot to cover the amount of ginger and cook the now marinated ginger slices in it for 45 seconds and drain through a strainer.
– Put hot ginger slices in a jar.
– Boil the rice vinegar and sugar together and pour over the ginger.
– Let sit out on the counter for 24 hours.
– Place jars into the refrigerator and leave at least 1 week before tasting. Taste will improve with time; a month in the fridge does well. It will keep well for 6 months.
We hope you have enjoyed learning some new recipes that will make any meal tastier no matter if you’re a vegan, veggie, or meat eater.
Many of the items can be fermented, if one likes, or ingredients can be cultured, too
Here’s part two of our Blog on Tsukemono
type pickles from Japan.
These are great for eating plain or a side dish,
a condiment, or mixed with plain rice!
Listed below are recipes that have been modified from the traditional form for the USA consumer as some ingredients are hard to find. What is Tsukemono?
Tsukemono (漬物?, literally “pickled things”) are Japanese style preserved vegetables (usually pickled in salt, brine, or a bed of nuka rice bran). Many are served with rice as an okazu (side dish), with drinks as an otsumami (snack), as an accompaniment to or garnish for meals, and as a course in the kaiseki portion of a Japanese tea ceremony.
Type
Kanji
Pickling Ingredient
Shiozuke
塩漬け
salt
Suzuke
酢漬け
vinegar
Amasuzuke
甘酢漬け
sugar and vinegar
Misozuke
味噌漬け
miso
Shoyuzuke
醤油漬け
soy sauce
Kasuzuke
粕漬け
sake kasu (sake lees)
Koji
塩麹
malted rice
Nukazuke
糠漬け
rice bran
Karashizuke
からし漬け
hot mustard
Satozuke
砂糖漬け
sugar
Today we’ll look at some new recipes that you can make at home. Place in the refrigerator and they can last for weeks…
Shibadsuke –
Sliced cucumber and tree ear mushroom salted and pickled with red shiso.
To make yourself, use any hearty mushroom that will hold it’s shape.
– Start by cutting fresh cucumber in half, removing the seeds and skin, then cut into thin strips.
– Soak the mushrooms, if dried, in enough water to cover. Once soft cut into thin strips. We used shiitake mushrooms.
– Bring the required amount(dependent on batch size) of rice wine vinegar to a boil, remove from heat, and add the shiso leaf and mushrooms. Allow to simmer until colour turns red and taste develops. If you don’t have shiso leaf try a Japanese shop or grow your own. You may be able to find the leaf already pickled, too.
– Remove from heat and add the cucumber slices. Mix together.
Add sea salt to taste. Allow mixture to set covered with vinegar at room temperature for 3 to 5 days. Then pack into jars and keep in refrigerator. Will keep for a month or more if kept cold and under brine. Hint: Add a little extra vinegar if liquid is not enough.
Here’s a photo of our results…
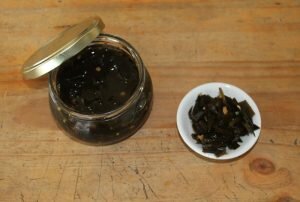
Sesame & Kombu –
Strip of kombu vegetable is cooked with sugar and soy sauce with bonito dashi. This is one of our favorites hands down. The saltiness of the sea combined with sweet sugar and rich soy sauce!
This Japanese quick pickle is easy to make…
– Start by washing the kombu and soaking until soft.
– With the kombu soaking, make a dashi broth by bringing the amount of water needed to a boil. Once water boils, remove from heat and add bonito flakes (a type of dried fish, shaved very thin). For good flavor you’ll want about a 1/2oz per 4 cups water. Once flakes the are steeped, strain liquid to remove the flakes. We like to eat the fish flakes, so they don’t have to be removed.
– Cut the kombu into thin strips
– Place the cut kombu into the broth and add sugar and soy sauce to taste.
– Allow to simmer until liquid concentrates then add the sesame seeds at the end. Adjust sugar and soy as needed, to taste.
Allow mixture to set covered with vinegar at room temperature for 3 to 5 days. Then pack into jars and keep in refrigerator. Will keep for a month or more if kept cold and under brine.
Here’s a photo of our results…
Ginger & Kombu –
Strip of kombu is cooked with sugar and soy sauce with bonito dashi.
Hint of ginger taste.
The same as making the sesame and kombu recipe but with the use of ginger root verse sesame seeds.
– Start by washing the kombu and soaking until soft.
– With the kombu soaking, make a dashi broth by bringing the amount of water needed to a boil. Once water boils, remove from heat and add bonito flakes(a type of dried fish, shaved very thin). For good flavor you’ll want about a 1/2oz per 4 cups water. Once flakes the are steeped, strain liquid to remove the flakes. We like to eat the fish flakes, so they don’t have to be removed.
– Cut the kombu into thin strips
– Place the cut kombu into the broth and add sugar, sliced or grated ginger and soy sauce to taste. Note: ginger root is strong to taste so not much is needed.
– Allow to simmer until liquid concentrates. Adjust sugar and soy as needed, to taste.
Allow mixture to set covered with vinegar at room temperature for 3 to 5 days. Then pack into jars and keep in refrigerator. Will keep for a month or more if kept cold and under brine.
Fuki Sansho –
Fuki is a kind of edible wild plant in mountain side in Japan.
Picked in Yamagata or Akita prefecture, north part of Japan.
Simmered in sweet sugar and soy sauce.
A hint of Japanese pepper tree seed.
This one we have not tried, but it could work with many plants.
The method is the same to simmer the plant in sugar and soy sauce.
The recipe is finished with a hint of strong pepper, like schezwan pepper.
Experiment with this one and see how it goes!


 These condiment sides are a great way to enhance a meal or dish. Very easy to make and uses only a few ingredients. The Japanese use many of these condiment sides every day and most contain minerals and micro-nutrients that normal


 Not really a condiment as it is used as a base, to build other flavors from. Used in many traditional Japanese dishes for that great added layer of flavor, called umami. Simple to make, but it adds a lot of flavor to a dish. Vegans and veggies can just make a seaweed and veggie dashi vs. using the bonito flakes.
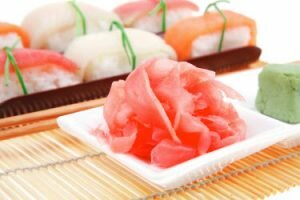
 What is Tsukemono?